Tuesday, December 27, 2022

How to set count on Tile using X++ (Update tile count runtime)

Deal All,

Today we are going to learn about how to set the count value on Tiles using x++ query. I came across this scenario during my resent customization. This will be helpful when you have requirement to filter tiles data count on the basis of unbound control of the form and that control value is not belongs to any of your dataSource columns.

Requirement: Add Integer control on the form and upon modification of that control update the count of Tile with the condition of records created before given number of days.

Logic: ((todays date  - Created Date) > number of days given in the control) then show on the count otherwise not.

Implementation Steps :

  1. Create AOT query to show all the record count without number of days filter.
  2. Create Tile and set below 2 properties. 
    Query: query name
    Type: count.
  3. Create new form.
  4. Add new Integer filter control on the form and set auto declaration property to Yes. (No of Days)
  5. Add new Tile button on your form and set tile property with above created tile name.
  6. Override the getData() and clicked method of your Tile button and add below code.
public void clicked()
{
    #Task
    super();
    element.task(#taskRefresh);
}

public TileButtonControlData getData()
{
    TileButtonControlData ret;
    ret = super();

    if(FilterNoOfDays.value() != 0)
    {
        int recordCOunt = element.countFromQuery(queryStr(TestTilePOLInes));                                               ret.strTileData(any2Str(recordCOunt));     
        return ret;
    }
}

7. add new method on form level with below code to get the count from query with No of days condition.

public Integer countFromQuery(str _query)
{
    int totalRecords;
    Query query = new Query(_query);
    QueryRun qr = new QueryRun(query);

    while (qr.next())
    {
        TESTAllPOLinesView dsTest = qr.get(tablenum(TESTAllPOLinesView));
        int dateDiff = today() - DateTimeUtil::date(dsTest.CreatedDateTime1);
        int filterValue = FilterNoOfDays.value();
        if( dateDiff > filterValue)
        {
            totalRecords++;
        }
    }
    return totalRecords;
}

8.Build and synch your project area and check the result by modifying the Number of days filter control.
 

Saturday, December 24, 2022

How to add range on AOT query and X++ with two different columns.

Hi All,
Let's learn about how to add two different data source columns range on one column range in AOT Query. also i am covering how can we apply same on X++ query.


Apply range on AOT Query:


Only the point to be consider is we need to use parenthesis correctly and Proper enum name - 
DocumentStatus::None.

Apply range on X++ Query.

Override the execute query method of your form Datasource and add below code.

public void executeQuery()
{

//Clear ranges.
this.query.dataSourceTable(tableNum(yourDatasourcename)).clearRanges();

Query query = new Query(this.query());


QueryBuildDataSource TestAllSOLinesView_ds1 = query.dataSourceTable(tableNum(TestAllSOLinesView));

queryBuildRange queryBuildRange = TestAllSOLinesView_ds1.addRange(fieldNum(TestAllSOLinesView, DocumentStatus));

queryBuildRange.value(strFmt('((DocumentStatus == %1) || ((TestConfirmationStatus == "%2") 
&& (DocumentStatus != %1)))',any2int(DocumentStatus::None),
any2int(TestConfirmation::ToBeConfirmed)));

this.query(query);

super();

}

AOT Range on 2 different date columns
 refer below screen shot - I have set the value property with greater than condition on two date column of my data source.

ex - (TestReqShippingDate > TestAllPOLinesView.TestConfirmedShippingDate)


How to create multi selection lookup on form control

Hi All,
In this article will see how to create multi selection lookup on a form control.

For this we need to create one AOT query like CustTablelookup. for that you can refer the documents provides by Microsoft docs.

Expected Result is below: 


Step 1: Create a control on form and set auto declaration property to yes. 


Step 2: Override the Init() method of form and add below code.

public class TestLookupTestControl extends FormRun
{
        SysLookupMultiSelectCtrl        custAccountMultiSelectControl;
}

public void init()
{

        super();

        custAccountMultiSelectControl = SysLookupMultiSelectCtrl::construct(element,FilterCustAccount, queryStr(CustTablelookup));       

}

Thats It. Happy Coding.


Monday, December 12, 2022

D365 F&O Warehouse management application customization Part 2- Perform auto click from x++ code.

Hi All,

Welcome to the second part of this series. In this blog will see how we can perform the auto click after auto populating values.

This is required because in standard logic system is working like on first click it will fetch item id , then on second click user will enter the quantity and so on. So if we are auto populating all the values in first click then we need to skip other clicks and process for the next form directly. Refer the issue on this link.

As we have learn in the first blog, you need to identify the child class according to your requirement and execution mode define in your menu item setup.
Below class is the extension of WHSWorkExecuteDisplayPOReceiving and created COC for displayForm() method.

Inside displayForm() method we need to identify the logic to trigger the auto button click.
In below case I have written a logic like once all the values are not equals to blank then perform auto click and for safer side to avoid recursion I have added one flag in pass object.

[ExtensionOf(classStr(WHSWorkExecuteDisplayPOReceiving))]
final class WHSWorkExecuteDisplayPOReceiving_ModelTest_Extension
{
    // COC of display form method in extension class.
    public container displayForm(container _con, str _buttonClicked)
    {
        Container returnedCon;
        #WHSWorkExecuteControlElements
        #WHSRF

        //Next statement

        returnedCon = next displayForm(_con, _buttonClicked);

        //Logic to skip the extra clicks goes here.
        if(step == 1 && !pass.exists("AutoClickOk")&&
        mode == WHSWorkExecuteMode::PurchaseOrderItemReceivingAndLocate)
        {
                pass.insert("AutoClickOk",'1');
                
                // this line will perform auto click
                returnedCon = this.displayForm(returnedCon, #RFOk); 
        }
        
        return returnedCon; 
    }
}


That's It. Lets enjoy the success of auto click and stay tuned for the next blog.

D365 F&O Warehouse management application customization Part 1- Auto populate the value to a standard field.

Hi All,
I hope everyone is doing great and learning new things. 
Here I am coming with a new blog to understand and guide everyone to learn the customization in Warehouse Management application. As you can see in the screenshot below, We have received by purchase order form on this form we will scan the QR string and auto populate the remaining field values.

This is the example of QR string format:  "PoNum,ItemId,Quantity,date"


As I understand from the code WHSWorkExecuteDisplay.displayForm() is the important method to create control and assign the values. It is an abstract method of class WHSWorkExecuteDisplay so that according to our requirement we need to figure out under which process you need to implement your changes to and then find its child class.

In my example child class WHSWorkExecuteDisplayPOReceiving so I have created an extension class for it and added COC for displayForm() method.

[ExtensionOf(classStr(WHSWorkExecuteDisplayPOReceiving))]
final class WHSWorkExecuteDisplayPOReceiving_ModelTest_Extension
{
    
}

All the controls on the form and its values are assigned through the container of display form method parameter(_con). so, to assign our values we need modify the same container.

below logic will take scanned value of QR code from PONum field then convert it to the container.

// COC of display form method in extension class.
 public container displayForm(container _con, str _buttonClicked)
 {
    if( mode == WHSWorkExecuteMode::PurchaseOrderItemReceivingAndLocate &&
         step == 1)
    {
            container      returnedCon, qrValueContainer;
            PurchId         purchId;
            ItemId           itemId;
            str                 quantityStr;
            const str       fullQRValueConstText        = "FullQRValue";
            #WHSWorkExecuteControlElements
            #WHSRF

            str  fullQRValue = this.getControlDataFromContainer(_con,#PONum);
        
            qrValueContainer = str2con(fullQRValue,'@');

            if(conLen(qrValueContainer) > 1)
            {
                pass.insert(fullQRValueConstText, fullQRValue);

                purchId       =  conPeek(qrValueContainer,1);
                quantityStr  =  conPeek(qrValueContainer,2);
                itemId         =  conPeek(qrValueContainer,3);

                _con = this.setControlDataFromContainer(_con, #PONum, purchId);
                stepLocal = step;
            }

        returnedCon = next displayForm(_con, _buttonClicked);
    
           if( mode == WHSWorkExecuteMode::PurchaseOrderItemReceivingAndLocate)
            {
                    // you can add logic here when to replace.
                    if(stepLocal == 1 && pass.lookup(#PONum) != '')
                    {
                        returnedCon  this.setControlDataFromContainer(returnedCon,                                                                                         #Qty,  strRem(quantityStr,'Q'));
                        returnedCon = this.setControlDataFromContainer(returnedCon, #ItemId, itemId);                        
                    }
            }
    }
    return returnedCon;
 }    

That's It. Happy Coding.
Please comment if you have faced any challenge to implement this.

Thursday, September 29, 2022

Deserialize JSON string in D365FO using X++ code

Hi All,
Hope everyone is doing great.

Today we are here to learn one of the common requirement in every integration i.e. how to de-serialize JSON string in D365FO/AX7 using X++ code.

Below is the JSON which is showing the population count by country and our requirement is to show all this details in Infolog or insert into AX Table.

Solution :
1) Create contract class for both outer and inner node.
2) Use FormJsonSerializer::deserializeObject method.

Sample JSON : "data": [
        {
            "ID Nation""01000US",
            "Nation""United States",
            "ID Year"2020,
            "Year""2020",
            "Population"326569308,
            "Slug Nation""united-states"
        },
        {
            "ID Nation""01000US",
            "Nation""United States",
            "ID Year"2019,
            "Year""2019",
            "Population"324697795,
            "Slug Nation""united-states"
        }]

Step 1 : Create contract class 1 to hold all the values of data node. 
Note : DataMemberAttribute name should be matched with JSON key name i.e. data, ID Nation

[DataContract]
internal final class TestJSONContract
{

    String50 parmNationId, parmNation,parmYearId,parmYear,parmPopulation,parmSlugNation;

    [DataMemberAttribute('ID Nation')]
    public String50 parmNationId(String50 _parmNationId = parmNationId)
    {

        parmNationId = _parmNationId;

        return parmNationId;

    }

    [DataMemberAttribute('Nation')]

    public String50 parmNation(String50 _parmNation = parmNation)

    {

        parmNation = _parmNation;

        return parmNation;

    }

    [DataMemberAttribute('ID Year')]

    public String50 parmYearId(String50 _parmYearId = parmYearId)

    {

        parmYearId = _parmYearId;

        return parmYearId;

    }

    [DataMemberAttribute('Year')]

    public String50 parmYear(String50 _parmYear = parmYear)

    {

        parmYear = _parmYear;

        return parmYear;

    }

    [DataMemberAttribute('Population')]
    public String50 parmPopulation(String50 _parmPopulation = parmPopulation)
    {

        parmPopulation = _parmPopulation;

        return parmPopulation;
    }


    [DataMemberAttribute('Slug Nation')]
    public String50 parmSlugNation(String50 _parmSlugNation = parmSlugNation)
    {

        parmSlugNation = _parmSlugNation;

        return parmSlugNation;

    }

}

Step 2 : Create contract class for outer node.

In your case if there is more than one outer node then you need to create your class according to your JOSN. ex- if you have status and data node in your JSON but "status" is string type and "data" node contains multiple sub node then you need to create one more attribute in below class with string type and data with list type.

[DataContract]
internal final class TestJSONDataContract

{
    List parmData;
    [DataMemberAttribute('data'),DataCollectionAttribute(Types::class, classStr(TestJSONContract))]

    public List parmData(List _parmData = parmData)
    {
        parmData = _parmData;

        return parmData;
    }
}

Step 3: Create runnable class to call your API and get the result.
internal final class TestConsumeAPITest
{

    /// <summary>
    /// Class entry point. The system will call this method when a designated menu |
    /// is selected or when execution starts and this class is set as the startup class.
    /// </summary>
    /// <param name = "_args">The specified arguments.</param>

    public static void main(Args _args)
    {

        System.Net.HttpWebRequest      webRequest;
        System.Net.HttpWebResponse    webresponse;
        System.Exception                        ex;
        System.IO.Stream                        responseStream;
        System.IO.StreamReader             reader;
        str                                                 output;
        ListEnumerator                            listEnumerator;

        try
        {
            new InteropPermission(InteropKind::ClrInterop).assert();

            webRequest = System.Net.WebRequest::Create("##########"); //your API URL goes here.       

            webRequest.Method = "GET";
            webRequest.ContentType = "application/json";
            webresponse = webRequest.GetResponse();
            responseStream = webresponse.GetResponseStream();
            reader = new System.IO.StreamReader(responseStream);

            output = reader.ReadToEnd();

            TestJSONDataContract  TestJSONDataContract =                  FormJsonSerializer::deserializeObject(classNum(TestJSONDataContract),output);

            List listData = new List(Types::Class);

            listData             = TestJSONDataContract.parmData();
            listEnumerator  = listData.getEnumerator();

            while (listEnumerator.moveNext())
            {

                TestJSONContract jsonDataContract = listEnumerator.current();

                info(strFmt("Nation id %1 : %2 = %3",jsonDataCOntract.parmNationId(),              jsonDataContract.parmNation(), jsonDataContract.parmPopulation()));
            }

        }

        catch
        {
            ex = CLRInterop::getLastException().GetBaseException();
            error(ex.get_Message());

        }

    }

}


Step Final : Execute your runnable class to test the API and JSON format.


Monday, August 22, 2022

How to remove country specific Bank account number validation in D365FO

Hi All,

I hope everyone is doing great. Lets see how can we remove the mandatory bank account validation.

Requirement :
In my case requirement is to remove JP country region specific validation, The scenario is quite different because generally all the bank validation is necessary to pass but we want to add all those bank account which user has already added in AX 2009 and same was giving validation error in F&O.so that we have achieved this by below customization.  

Solution:  
We need to skip validation from standard code by creating new extension of Bank_JP class.


Implementation : 
Create extension for Bank_JP class to write COC of method  checkBankAccountNum() and checkBankAccount() and add below code.

[ExtensionOf(classStr(Bank_JP))]
final class Bank_JP_Test_Extension
{

    public boolean checkBankAccount(BankAccountMap _bankAccountMap)
    {
        next checkBankAccount(_bankAccountMap);
        infolog.clear(0);
        return true;

    }
    public boolean checkBankAccountNum(BankAccount _bankAccount)
    {

        next checkBankAccountNum(_bankAccount);
        infolog.clear(0);
        return true;
    }

}

Build your solution and check.

That's it.....:) 

Thursday, August 18, 2022

Create code extension of your object new feature

Hey everyone,

Exciting news! D365FO now has a cool new feature that lets you create extensions for your objects. The best part is, you don't have to worry about remembering complex syntax or messing up the naming convention in your project. It's super handy and makes working on your project a breeze! Check it out!

Check this below features-


It will create new class in your project with standard define format.


Happy Coding.... :) 


Tuesday, June 28, 2022

How to use vendor disbursement journal workflow for vendor creation

Hi D365Fo Community,
Welcome to my new blog, This is a common requirement to have workflow for Vendor Creation process but standard does not support this. so lets learn how can we utilize vendor disbursement journal workflow for vendor creation by doing small customization.

Requirement : All the new vendors should go through approval process.

Solution
1) Use vendor amendment workflow during vendor creation.
2) Put Vendor on Hold until it is approved.  
3) Restrict original submit to workflow functionality until user provide approval for Creation workflow.
4) Not allow to create record in proposed changes table during creation workflow.
5) Restrict to call amendment workflow in case you modify the field which is enabled in AP parameter > Vendor approval tab

Prerequisite - Need to have Vendor amendment workflow setup. Please click on vendor workflow setup.

Step by step implementation -

 Step 1 : Add new enum type of field in VendTable :
            fieldname - DemoCreationWorkflowApproved
            EDT          - NoYesId    

Step 2 : Write COC for VendTable method insert().
Description : Assign No during record creation.

[ExtensionOf(tableStr(VendTable))]
final class DemoVendTable_Extension
{
   //Assign No during record creation.
    public void insert()
    {
         if(!this.RecId)
        {
            this.DemoCreationWorkflowApproved= NoYes::No;
         }
         next insert();
    }

    // Update blocked to No once it is approved by User and set DemoCreationWorkflowApproved to Yes
     
      public static void updateWorkflowState(RecId _recId, VendTableChangeProposalWorkflowState _state)
     {
            next updateWorkflowState( _recId,  _state);
            ttsbegin;
            VendTable vendTable = VendTable::findRecId(_recId, true);
            if( _state == VendTableChangeProposalWorkflowState::Approved)
            {
                  vendTable.Blocked               =  CustVendorBlocked::No;
                  vendTable.DemoCreationWorkflowApproved= NoYes::Yes;
                  vendTable.update();
            }
            ttscommit;

      }

}

Step 3: Block the vendor for all area till it is approved.
Create new class to keep event handlers for table methods. Copy the post event handler of insert method and add below code.

class DemoVendTableEventHandler
{
    [PostHandlerFor(tableStr(VendTable), tableMethodStr(VendTable, insert))]
    public static void VendTable_Post_insert(XppPrePostArgs args)
    {
        VendTable vendTable = args.getThis() as VendTable;

        if(vendTable)
        {
            ttsbegin;
            vendTable.selectForUpdate(true);
            vendTable.Blocked = CustVendorBlocked::All;
            vendTable.update();
            ttscommit;
            vendTable.reread();

        }
    }

}

Step 4 :  Create COC for main method of class VendTableChangeProposalWorkflowSubmitManager and add below code.
This is to not allow user to use standard workflow during vendor creation.

[ExtensionOf(classStr(VendTableChangeProposalWorkflowSubmitManager))]
final class DemoVendTableChangeProposalWorkflowSubmitManager_Extension
{
    public static void main(Args _args)
    {
        if (!_args.record() || !_args.caller())
        {
            throw error(Error::wrongUseOfFunction(funcName()));
        }

        VendTable  vendTable = _args.record();
        if(vendTable.DemoCreationWorkflowApproved== NoYes::No)
        {
            throw error("Creation workflow not yet approved.");
        }
        next main(_args);
    }
}

}

Step 5 : Create COC for init() method of form VendChangeProposal
We will not allow to open proposed changes form on modification of any standard field which is enabled for amendment workflow, and delete the record if exists for vendor if not approved and workflow state is Not Submitted.

[ExtensionOf(formstr(VendChangeProposal))]
final class DemoVendChangeProposalForm_Extension
{
    public void init()
    {
        VendTableChangeProposal vendProposal;
         next init();
        if(!callerRecord.DemoCreationWorkflowApproved)
        {
            if(callerRecord.Workflowstate == VendTableChangeProposalWorkflowState::NotSubmitted)
            {
                delete_from vendProposal
                where vendProposal.VendTable == callerRecord.RecId;
            }
            this.close(); // code the close the open form
        }        

    }

}

Step 6 : Create new class to call amendment workflow and add below code.

class DemoCallVendorDisbursementWFHelper
{
    public static void main(Args _args)
    {

        FormDataSource ds =  _args.caller().datasource();
        VendTable                      vendTable = ds.cursor();

        if(vendTable)
        {
            DemoCallVendorDisbursementWFHelper ::submitToVendWorkflow(vendTable);
            ds.research(true);
            ds.refresh();
        }
    }

    public static void submitToVendWorkflow(VendTable _vendTable)
    {

        WorkflowCorrelationId      workflowCorrelationId;
        if(_vendTable.DemoCreationWorkflowApproved)
        {
            throw error("Vendor creation workflow is already approved.");
        }

        Notes note = strFmt("%1 Vendor changes",_vendTable.AccountNum);
        workflowCorrelationId =      Workflow::activateFromWorkflowType(WorkflowTypestr(VendTableChangeProposalWorkflow),     _vendTable.RecId,note , NoYes::No);        

        _vendTable.selectForUpdate(true);
        _vendTable.WorkflowState = VendTableChangeProposalWorkflowState::Submitted;
        _vendTable.update();
        _vendTable.reread();       
        VendTableChangeProposal vendTableChangeProposal =                       VendTableChangeProposal::findByVendRecId(_vendTable.RecId);

        if(!vendTableChangeProposal)
        {
            //Need to have one record created with vendor recId or else it will throw the error during approval.
            vendTableChangeProposal.Name        = _vendTable.name();

            vendTableChangeProposal.VendTable   = _vendTable.RecId;
            vendTableChangeProposal.insert();
        }       
    }
}

Step 7 : Create new menu item button on form and set below property
Menu item type - Action
object = DemoCallVendorDisbursementWFHelper


Note - By above button we can only submit the workflow rest other workflow operation can be handled by standard workflow button i.e. Approve, delegate, workflow history.

That's it!!!, Please implement this and let me know if you face any issues.
Please add comment and like if you like this blog.

Next Blog - How to add custom field in Vendor amendment workflow. 

Wednesday, June 22, 2022

How to add sender email address for Payment remittance (Advice) in D365FO

Hi All, 

Thank you for visiting this blog. This blog is all about how to set from email address for Print Management functionality. 

As we all know there is no option in standard to configure sender email address for Payment advice report or any other report which is printing through Print management, except if we configure it by electronics reporting. So lets see how can achieve this by doing very small customization.

If you look into the standard class (SrsReportRunMailer) there is method buildFromEmailAddress(). This method is picking email address of current user id and using as from email address, this we want to change to the custom parameter. i.e. Test@gmail.com.

PS - I am writing COC of emailReport() method of class SrsReportRunMailer because buildFromEmailAddress() method is declared as private so we can not create COC or event handler of it.

Please follow below steps to complete this customization.

Step 1: Create new parameter in accounts payable parameter form to store from email address.

Step 2 : Create new class to write COC of emailReport() method.
Class name should be end with _Extension.  Ex . TestSrsReportRunBuilder_Extension

[ExtensionOf(classStr(SrsReportRunMailer))]
public final class TestSrsReportRunBuilder_Extension
{

}

Step 3 : Add below code 

public boolean emailReport(SrsReportEMailDataContract emailContract, System.Byte[] reportBytes, str fileName)
{
        str tofindStr       = 'Payment advice'; // this string should be present in email subject which can be define in //Print Management parameter. Please refer link for more details about how to setup email subject.
        str emailSubject    = emailContract.parmSubject();

        if(strScan(emailSubject,tofindStr,1,strLen(emailSubject))) 
        {
            fromAddress = VendParameters::find().TestFromEmailAddressPaymentAdvice;
            mailer = this.parmSysMailer();
            if (!fromAddress || !SysEmailDistributor::validateEmail(fromAddress))
            {
                error(strfmt("@SYS134596", "@SYS4083"));
            }
        }

        // Next call
        boolean ret = next emailReport(emailContract,reportBytes,fileName);
        return ret;
}

Expected result - 


Thursday, June 9, 2022

Throw exception from Catch block - New feature after PU 31 in D365FO

Hi All,
Lets understand this new feature to throw the exception from catch block .

Now we can use throw from catch block. This way throw will work like re-throw and send cached exception to the outer catch block. Lets understand it by sample code.

X++ Code.
try
{
    throw Exception::error;
}
catch
{
    // locally handle exception
    // then rethrow for caller
    throw;
}


Thank you.

Wednesday, June 8, 2022

Difference between Insert and RecordInsertList in D365FO

Hi All,
let's learn how RecordInsertList makes difference in your system performance.

As we all know insert() method and RecordInsertList both are used to insert the record into database. but here we will discuss when we should use insert and when we should use RecordInsertList. 

insert() method will insert only one record at a time. This is required to use when there is any dependent action i.e. if you want to store RecordId of header table into line table also if there is some code which is written in insert method and we want to call it then we need to use insert method.

RecordInsertlist will insert multiple records in database by one DB trip. This is faster than insert method.

X++ Code For insert() method

Create runnable class and add below code into it, make sure you have sample table created (TestInsertRecordTable with 2 fields RecordNumber and Description)

internal final class TestRecordListInsertJob1
{
    public static void main(Args _args)
    {

        int                 i;
        int                 timerStart, timerEnd;
        str                 timeConsumed;       
        TestInsertRecordTable  testInsertRecordTable;
        timerStart     = timeNow();
        
        ttsbegin;

        for (i = 1; i<10000; i++)
        {
            testInsertRecordTable.RecordNumber = i;
            testInsertRecordTable.Description = 'TestDescription';
            testInsertRecordTable.insert();
        }

        ttscommit;

        timerEnd = timeNow();

        timeConsumed = timeConsumed(timerStart, timerEnd);

        info(strFmt("Insert method result: Added %1 rows in %2 seconds", i, timeConsumed));

    }
}


Result of insert method took 45 seconds to insert 10000 records.


X++ code  for RecordInsertList
Create runnable class and add below code into it.

internal final class TestRecordInsertJob2
{
    public static void main(Args _args)
    { 
            int                     i,timerStart, timerEnd,row;
            str                     timeConsumed;
            TestInsertRecordTable   testInsertRecordTable,newTestInsertRecordTable;
            RecordInsertList        testInsertRecordTableList;

            testInsertRecordTableList =  new RecordInsertList(tableNum(TestInsertRecordTable));
            timerStart = timeNow();
            row = 1;

            ttsbegin;
            for (i = 10001; i<20000; i++)
            {
                newTestInsertRecordTable.RecordNumber = i;
                newTestInsertRecordTable.Description = 'TestDescriptionRecordInsertList';
                testInsertRecordTableList.add(newTestInsertRecordTable);

                row++;
            }
            testInsertRecordTableList.insertDatabase();
            ttscommit;

            timerEnd = timeNow();

            timeConsumed = timeConsumed(timerStart, timerEnd);

            info(strFmt("RecordInsertList result : Added %1 rows in %2 seconds", row, timeConsumed));

        }

}

Result of RecordInsertList took 2 seconds to insert 10000.


RecordInsertList is far faster than insert() so always prefer it in your logic.

Get SQL statement of your X++ Query

Hi All,
This blog will help us to get the SQL statement of your X++ query.

generateonly you need to extend your x++ select with generateonly command that will generate the query before it execute.

Expected result 


X++ Code

Create one runnable class (TestGetSQLStatementOfXPlusPlusQuery) and add below code to test.

internal final class TestGetSQLStatementOfXPlusPlusQuery
{
    public static void main(Args _args)
    {
        VendTable   vendTable;

        select generateonly firstonly AccountNum, Party from vendTable
            where vendTable.AccountNum == 'Test123';

        info(vendTable.getSQLStatement());    

    }
}

Sunday, June 5, 2022

Create multi selection lookup in D365FO for SSRS report.

Hi All,

Lets learn about multi selection lookup in SSRS report and basic of SSRS report.

Requirement : Add voucher lookup from VendTrans on SSRS report dialog.

Step 1 : Create new project area.


Select custom model and mark Synchronize DB on build true and click apply.


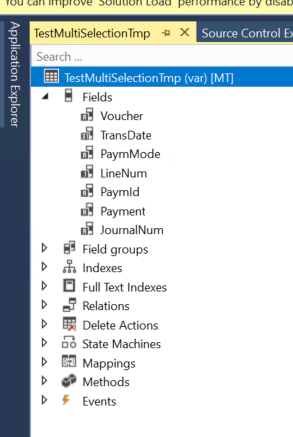
Step 2 : Create temporary  table 


Step 3: Create UI builder class 
Create UI Builder class , extend it from SysOperationAutomaticUIBuilder

public final class TestMultiSelectionUIBuilder extends SysOperationAutomaticUIBuilder
{
    DialogField dialogVoucherId;
    public void VoucherIdLookup(FormStringControl _control)
    {
        Query                               query = new Query();
        QueryBuildDataSource    qbds;
        container                           conVoucherID;
        
        qbds = query.addDataSource(tableNum(VendTrans));
        qbds.addSelectionField(fieldNum(VendTrans,Voucher));

        SysLookupMultiSelectGrid::lookup(query,_control,_control,_control,conVoucherID);
    }

    public void postBuild()
    {
        TestMultiSelectionLookupContract  contract;
        super();
        contract = this.dataContractObject() as TestMultiSelectionLookupContract ;
        //bind lookup method to report parameter field.
        dialogVoucherId = this.bindInfo().getDialogField(this.dataContractObject(),methodStr(TestMultiSelectionLookupContract , parmVoucherId));

        //override standard lookup method and append your voucher id lookup.
        dialogVoucherId.registerOverrideMethod(methodStr(FormStringControl, lookup),methodStr(TestMultiSelectionUIBuilder ,VoucherIdLookup), this);

        if (dialogVoucherId)
        {
            dialogVoucherId.lookupButton(2);
        }
    }

    public void postRun()
    {
        //super();
    }

}


Step 4 : Create Contract class 

[DataContractAttribute , SysOperationContractProcessingAttribute(classStr(TestMultiSelectionUIBuilder))]
public final class TestMultiSelectionLookupContract 
{
    List    voucherlist;     

    [DataMemberAttribute("Exclude voucher"),AifCollectionTypeAttribute("Exclude voucher",  Types::String),SysOperationLabelAttribute(literalStr("ExcludeVoucher")),SysOperationDisplayOrderAttribute('0')]
    public List parmVoucherId(List _listVoucherId = voucherlist)
    {
        voucherlist = _listVoucherId;
        return voucherlist;
    }
}

Step 3 : Create DP class 
Create DP class as shown below.
[SRSReportParameterAttribute(classstr(TestMultiSelectionLookupContract))]
public final class TestMultiSelectionDP extends SRSReportDataProviderBase
{
    TestMultiSelectionTmp   testMultiSelectionTmp;
    List                    voucherlist;
    str                     voucherStr;

    [SRSReportDataSetAttribute(tablestr(TestMultiSelectionTmp))]
    public TestMultiSelectionTmp getMTVendorCashForecastTmp()
    {
        select * from testMultiSelectionTmp;
        return testMultiSelectionTmp;
    }

    [SysEntryPointAttribute]
    public void processReport()
    {
        TestMultiSelectionLookupContract    testMultiSelectionLookupContract    = this.parmDataContract() as TestMultiSelectionLookupContract;
        ListIterator                              voucherlistItreator;
        ledgerJournalTrans                  ledgerJournalTrans;
        voucherlist = testMultiSelectionLookupContract.parmVoucherId();

        if(voucherlist != null)
        {
            voucherlistItreator = new ListIterator(voucherlist);
            while (voucherlistItreator.more())
            {
               voucherStr += voucherlistItreator.value()+',';
              
                voucherlistItreator.next();
            }
        }
        voucherStr = subStr(voucherStr,1,strLen(voucherStr)-1);
        Info(voucherStr);


        // write your logic to insert data into temp table.
    }

}

Step 5 : Create report 


Step 6 : Create controller class to call report.

internal final class TestMultiSelectionLookupController extends SrsReportRunController
{
    public void new()
    {
        super();
        this.caption();
    }

    protected final str getReportName(TestMultiSelectionLookupContract _contract)
    {
        str reportNameLocal;

        reportNameLocal = ssrsReportStr(TestMultiSelectionReport,Test1);
        
        return reportNameLocal;
    }

    public ClassDescription caption()
    {
        return "Multi selection lookup";
    }

    public static void main(Args _args)
    {
        TestMultiSelectionLookupController  controller;

        controller = new TestMultiSelectionLookupController();
        controller.parmArgs(_args);
        controller.ParmReportName(ssrsReportStr(TestMultiSelectionReport,Test1));

        controller.startOperation();
    
    }

    protected void preRunModifyContract()
    {
        TestMultiSelectionLookupContract contract = this.parmReportContract().parmRdpContract() as TestMultiSelectionLookupContract;
        this.parmReportContract().parmReportName(this.getReportName(contract));
        super();
    }

}

Step 6 : Create one Output menu item and add object as your controller class and assign it to the menu.


Step Last : 

Result 

Thursday, May 26, 2022

How to create field Id lookup in D365FO

Hi D365FO Team,


I am creating another blog here to know how to create table field Id Lookup.

Requirement - Show all VendTable field in lookup.

Solution/Steps

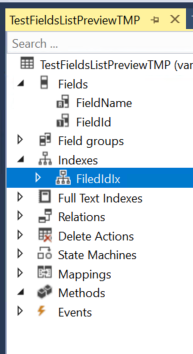
1) Create temprary table as shown in below screen with 2 fields.
Table name - TestFieldsListPreviewTMP
FieldName - use EDT fieldnameShort
FieldId  - use EDT Integer

Set Property - TableType = InMemory
Create Primary index on FieldId

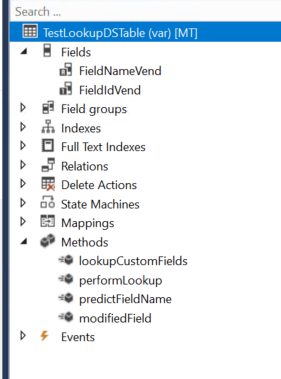
2) Create new table TestLookupDSTable for formDatasource where you want to show table field lookup.


Add methods in above table-

Create lookupFields() method to insert all the field list from table buffer.

public static TestFieldsListPreviewTMP  lookupCustomFields(Common   _common)
{
        var dictTable = new DictTable(_common.TableId);
        FieldId fieldId = dictTable.fieldNext(0);

        TestFieldsListPreviewTMP  fieldListPreview;

        while (fieldId && ! isSysId(fieldId))
        {
            fieldListPreview.FieldId = fieldId;
            fieldListPreview.FieldName = fieldId2PName(_common.tableId, fieldId);
            fieldListPreview.insert();
            fieldId = dictTable.fieldNext(fieldId);
        }
        return fieldListPreview;
}

public static void performLookup(Common _common, FormControl _formControl)
{

     SysTableLookup sysTableLookup =         SysTableLookup::newParameters(tablenum(TestFieldsListPreviewTMP), _formControl);

        Query query = new Query();
        QueryBuildDataSource queryBuildDataSource;
        queryBuildDataSource = query.addDataSource(tablenum(TestFieldsListPreviewTMP));
        queryBuildDataSource.addSortField(fieldNum(TestFieldsListPreviewTMP, FieldId), SortOrder::Ascending);

        sysTableLookup.addLookupfield(fieldnum(TestFieldsListPreviewTMP, FieldId), true);
        sysTableLookup.addLookupfield(fieldnum(TestFieldsListPreviewTMP, FieldName));
        sysTableLookup.parmQuery(query);

        TestFieldsListPreviewTMPfieldListTMP;

        fieldListTMP = TestForDataSourceTable::lookupCustomFields(_common);

        //TestVend2CustMapping is a form data source table.
        sysTableLookup.parmTmpBuffer(fieldListTMP);
        sysTableLookup.performFormLookup();

    }

//Populate field name 
public static FieldName predictFieldName(TableId _tableId, FieldId _fieldId)
{
        return fieldId2PName(_tableId, _fieldId);
}

public void modifiedField(FieldId _fieldId)
{
        super(_fieldId);
        switch(_fieldId)
        {
            case (fieldNum(TestLookupDSTable,FieldIdVend )) :           
                this.FieldNameVend = TestLookupDSTable::predictFieldName(tableNum(VendTable), this.FieldIdVend);             

                break;
            default:

        }
}


3) Create new form and add TestLookupDSTable as data source and override datasource field lookup method and write below code.


public void lookup(FormControl _formControl, str _filterStr)
{
     VendTable   vendTable;

     TestLookupDSTable::performLookup(vendTable, _formControl);

}


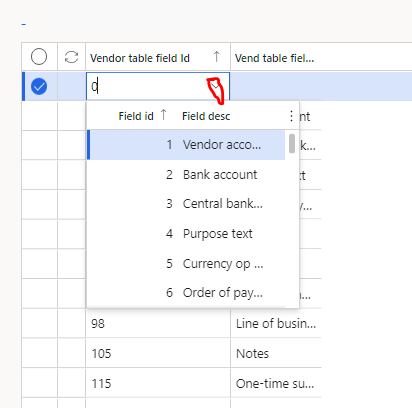
Result - 


Post partial packing slip in D365FO

How to Post a Partial Packing Slip in D365FO and AX 2012 How to Post a Partial Packing Slip in D365FO and AX 2012 Understanding t...