Tuesday, June 28, 2022

How to use vendor disbursement journal workflow for vendor creation

Hi D365Fo Community,
Welcome to my new blog, This is a common requirement to have workflow for Vendor Creation process but standard does not support this. so lets learn how can we utilize vendor disbursement journal workflow for vendor creation by doing small customization.

Requirement : All the new vendors should go through approval process.

Solution
1) Use vendor amendment workflow during vendor creation.
2) Put Vendor on Hold until it is approved.  
3) Restrict original submit to workflow functionality until user provide approval for Creation workflow.
4) Not allow to create record in proposed changes table during creation workflow.
5) Restrict to call amendment workflow in case you modify the field which is enabled in AP parameter > Vendor approval tab

Prerequisite - Need to have Vendor amendment workflow setup. Please click on vendor workflow setup.

Step by step implementation -

 Step 1 : Add new enum type of field in VendTable :
            fieldname - DemoCreationWorkflowApproved
            EDT          - NoYesId    

Step 2 : Write COC for VendTable method insert().
Description : Assign No during record creation.

[ExtensionOf(tableStr(VendTable))]
final class DemoVendTable_Extension
{
   //Assign No during record creation.
    public void insert()
    {
         if(!this.RecId)
        {
            this.DemoCreationWorkflowApproved= NoYes::No;
         }
         next insert();
    }

    // Update blocked to No once it is approved by User and set DemoCreationWorkflowApproved to Yes
     
      public static void updateWorkflowState(RecId _recId, VendTableChangeProposalWorkflowState _state)
     {
            next updateWorkflowState( _recId,  _state);
            ttsbegin;
            VendTable vendTable = VendTable::findRecId(_recId, true);
            if( _state == VendTableChangeProposalWorkflowState::Approved)
            {
                  vendTable.Blocked               =  CustVendorBlocked::No;
                  vendTable.DemoCreationWorkflowApproved= NoYes::Yes;
                  vendTable.update();
            }
            ttscommit;

      }

}

Step 3: Block the vendor for all area till it is approved.
Create new class to keep event handlers for table methods. Copy the post event handler of insert method and add below code.

class DemoVendTableEventHandler
{
    [PostHandlerFor(tableStr(VendTable), tableMethodStr(VendTable, insert))]
    public static void VendTable_Post_insert(XppPrePostArgs args)
    {
        VendTable vendTable = args.getThis() as VendTable;

        if(vendTable)
        {
            ttsbegin;
            vendTable.selectForUpdate(true);
            vendTable.Blocked = CustVendorBlocked::All;
            vendTable.update();
            ttscommit;
            vendTable.reread();

        }
    }

}

Step 4 :  Create COC for main method of class VendTableChangeProposalWorkflowSubmitManager and add below code.
This is to not allow user to use standard workflow during vendor creation.

[ExtensionOf(classStr(VendTableChangeProposalWorkflowSubmitManager))]
final class DemoVendTableChangeProposalWorkflowSubmitManager_Extension
{
    public static void main(Args _args)
    {
        if (!_args.record() || !_args.caller())
        {
            throw error(Error::wrongUseOfFunction(funcName()));
        }

        VendTable  vendTable = _args.record();
        if(vendTable.DemoCreationWorkflowApproved== NoYes::No)
        {
            throw error("Creation workflow not yet approved.");
        }
        next main(_args);
    }
}

}

Step 5 : Create COC for init() method of form VendChangeProposal
We will not allow to open proposed changes form on modification of any standard field which is enabled for amendment workflow, and delete the record if exists for vendor if not approved and workflow state is Not Submitted.

[ExtensionOf(formstr(VendChangeProposal))]
final class DemoVendChangeProposalForm_Extension
{
    public void init()
    {
        VendTableChangeProposal vendProposal;
         next init();
        if(!callerRecord.DemoCreationWorkflowApproved)
        {
            if(callerRecord.Workflowstate == VendTableChangeProposalWorkflowState::NotSubmitted)
            {
                delete_from vendProposal
                where vendProposal.VendTable == callerRecord.RecId;
            }
            this.close(); // code the close the open form
        }        

    }

}

Step 6 : Create new class to call amendment workflow and add below code.

class DemoCallVendorDisbursementWFHelper
{
    public static void main(Args _args)
    {

        FormDataSource ds =  _args.caller().datasource();
        VendTable                      vendTable = ds.cursor();

        if(vendTable)
        {
            DemoCallVendorDisbursementWFHelper ::submitToVendWorkflow(vendTable);
            ds.research(true);
            ds.refresh();
        }
    }

    public static void submitToVendWorkflow(VendTable _vendTable)
    {

        WorkflowCorrelationId      workflowCorrelationId;
        if(_vendTable.DemoCreationWorkflowApproved)
        {
            throw error("Vendor creation workflow is already approved.");
        }

        Notes note = strFmt("%1 Vendor changes",_vendTable.AccountNum);
        workflowCorrelationId =      Workflow::activateFromWorkflowType(WorkflowTypestr(VendTableChangeProposalWorkflow),     _vendTable.RecId,note , NoYes::No);        

        _vendTable.selectForUpdate(true);
        _vendTable.WorkflowState = VendTableChangeProposalWorkflowState::Submitted;
        _vendTable.update();
        _vendTable.reread();       
        VendTableChangeProposal vendTableChangeProposal =                       VendTableChangeProposal::findByVendRecId(_vendTable.RecId);

        if(!vendTableChangeProposal)
        {
            //Need to have one record created with vendor recId or else it will throw the error during approval.
            vendTableChangeProposal.Name        = _vendTable.name();

            vendTableChangeProposal.VendTable   = _vendTable.RecId;
            vendTableChangeProposal.insert();
        }       
    }
}

Step 7 : Create new menu item button on form and set below property
Menu item type - Action
object = DemoCallVendorDisbursementWFHelper


Note - By above button we can only submit the workflow rest other workflow operation can be handled by standard workflow button i.e. Approve, delegate, workflow history.

That's it!!!, Please implement this and let me know if you face any issues.
Please add comment and like if you like this blog.

Next Blog - How to add custom field in Vendor amendment workflow. 

Wednesday, June 22, 2022

How to add sender email address for Payment remittance (Advice) in D365FO

Hi All, 

Thank you for visiting this blog. This blog is all about how to set from email address for Print Management functionality. 

As we all know there is no option in standard to configure sender email address for Payment advice report or any other report which is printing through Print management, except if we configure it by electronics reporting. So lets see how can achieve this by doing very small customization.

If you look into the standard class (SrsReportRunMailer) there is method buildFromEmailAddress(). This method is picking email address of current user id and using as from email address, this we want to change to the custom parameter. i.e. Test@gmail.com.

PS - I am writing COC of emailReport() method of class SrsReportRunMailer because buildFromEmailAddress() method is declared as private so we can not create COC or event handler of it.

Please follow below steps to complete this customization.

Step 1: Create new parameter in accounts payable parameter form to store from email address.

Step 2 : Create new class to write COC of emailReport() method.
Class name should be end with _Extension.  Ex . TestSrsReportRunBuilder_Extension

[ExtensionOf(classStr(SrsReportRunMailer))]
public final class TestSrsReportRunBuilder_Extension
{

}

Step 3 : Add below code 

public boolean emailReport(SrsReportEMailDataContract emailContract, System.Byte[] reportBytes, str fileName)
{
        str tofindStr       = 'Payment advice'; // this string should be present in email subject which can be define in //Print Management parameter. Please refer link for more details about how to setup email subject.
        str emailSubject    = emailContract.parmSubject();

        if(strScan(emailSubject,tofindStr,1,strLen(emailSubject))) 
        {
            fromAddress = VendParameters::find().TestFromEmailAddressPaymentAdvice;
            mailer = this.parmSysMailer();
            if (!fromAddress || !SysEmailDistributor::validateEmail(fromAddress))
            {
                error(strfmt("@SYS134596", "@SYS4083"));
            }
        }

        // Next call
        boolean ret = next emailReport(emailContract,reportBytes,fileName);
        return ret;
}

Expected result - 


Thursday, June 9, 2022

Throw exception from Catch block - New feature after PU 31 in D365FO

Hi All,
Lets understand this new feature to throw the exception from catch block .

Now we can use throw from catch block. This way throw will work like re-throw and send cached exception to the outer catch block. Lets understand it by sample code.

X++ Code.
try
{
    throw Exception::error;
}
catch
{
    // locally handle exception
    // then rethrow for caller
    throw;
}


Thank you.

Wednesday, June 8, 2022

Difference between Insert and RecordInsertList in D365FO

Hi All,
let's learn how RecordInsertList makes difference in your system performance.

As we all know insert() method and RecordInsertList both are used to insert the record into database. but here we will discuss when we should use insert and when we should use RecordInsertList. 

insert() method will insert only one record at a time. This is required to use when there is any dependent action i.e. if you want to store RecordId of header table into line table also if there is some code which is written in insert method and we want to call it then we need to use insert method.

RecordInsertlist will insert multiple records in database by one DB trip. This is faster than insert method.

X++ Code For insert() method

Create runnable class and add below code into it, make sure you have sample table created (TestInsertRecordTable with 2 fields RecordNumber and Description)

internal final class TestRecordListInsertJob1
{
    public static void main(Args _args)
    {

        int                 i;
        int                 timerStart, timerEnd;
        str                 timeConsumed;       
        TestInsertRecordTable  testInsertRecordTable;
        timerStart     = timeNow();
        
        ttsbegin;

        for (i = 1; i<10000; i++)
        {
            testInsertRecordTable.RecordNumber = i;
            testInsertRecordTable.Description = 'TestDescription';
            testInsertRecordTable.insert();
        }

        ttscommit;

        timerEnd = timeNow();

        timeConsumed = timeConsumed(timerStart, timerEnd);

        info(strFmt("Insert method result: Added %1 rows in %2 seconds", i, timeConsumed));

    }
}


Result of insert method took 45 seconds to insert 10000 records.


X++ code  for RecordInsertList
Create runnable class and add below code into it.

internal final class TestRecordInsertJob2
{
    public static void main(Args _args)
    { 
            int                     i,timerStart, timerEnd,row;
            str                     timeConsumed;
            TestInsertRecordTable   testInsertRecordTable,newTestInsertRecordTable;
            RecordInsertList        testInsertRecordTableList;

            testInsertRecordTableList =  new RecordInsertList(tableNum(TestInsertRecordTable));
            timerStart = timeNow();
            row = 1;

            ttsbegin;
            for (i = 10001; i<20000; i++)
            {
                newTestInsertRecordTable.RecordNumber = i;
                newTestInsertRecordTable.Description = 'TestDescriptionRecordInsertList';
                testInsertRecordTableList.add(newTestInsertRecordTable);

                row++;
            }
            testInsertRecordTableList.insertDatabase();
            ttscommit;

            timerEnd = timeNow();

            timeConsumed = timeConsumed(timerStart, timerEnd);

            info(strFmt("RecordInsertList result : Added %1 rows in %2 seconds", row, timeConsumed));

        }

}

Result of RecordInsertList took 2 seconds to insert 10000.


RecordInsertList is far faster than insert() so always prefer it in your logic.

Get SQL statement of your X++ Query

Hi All,
This blog will help us to get the SQL statement of your X++ query.

generateonly you need to extend your x++ select with generateonly command that will generate the query before it execute.

Expected result 


X++ Code

Create one runnable class (TestGetSQLStatementOfXPlusPlusQuery) and add below code to test.

internal final class TestGetSQLStatementOfXPlusPlusQuery
{
    public static void main(Args _args)
    {
        VendTable   vendTable;

        select generateonly firstonly AccountNum, Party from vendTable
            where vendTable.AccountNum == 'Test123';

        info(vendTable.getSQLStatement());    

    }
}

Sunday, June 5, 2022

Create multi selection lookup in D365FO for SSRS report.

Hi All,

Lets learn about multi selection lookup in SSRS report and basic of SSRS report.

Requirement : Add voucher lookup from VendTrans on SSRS report dialog.

Step 1 : Create new project area.


Select custom model and mark Synchronize DB on build true and click apply.


Step 2 : Create temporary  table 


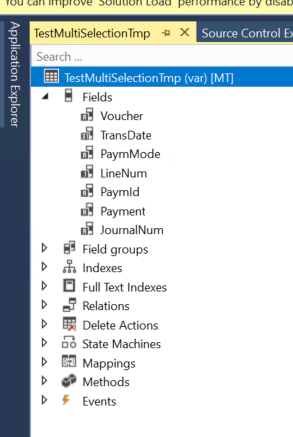
Step 3: Create UI builder class 
Create UI Builder class , extend it from SysOperationAutomaticUIBuilder

public final class TestMultiSelectionUIBuilder extends SysOperationAutomaticUIBuilder
{
    DialogField dialogVoucherId;
    public void VoucherIdLookup(FormStringControl _control)
    {
        Query                               query = new Query();
        QueryBuildDataSource    qbds;
        container                           conVoucherID;
        
        qbds = query.addDataSource(tableNum(VendTrans));
        qbds.addSelectionField(fieldNum(VendTrans,Voucher));

        SysLookupMultiSelectGrid::lookup(query,_control,_control,_control,conVoucherID);
    }

    public void postBuild()
    {
        TestMultiSelectionLookupContract  contract;
        super();
        contract = this.dataContractObject() as TestMultiSelectionLookupContract ;
        //bind lookup method to report parameter field.
        dialogVoucherId = this.bindInfo().getDialogField(this.dataContractObject(),methodStr(TestMultiSelectionLookupContract , parmVoucherId));

        //override standard lookup method and append your voucher id lookup.
        dialogVoucherId.registerOverrideMethod(methodStr(FormStringControl, lookup),methodStr(TestMultiSelectionUIBuilder ,VoucherIdLookup), this);

        if (dialogVoucherId)
        {
            dialogVoucherId.lookupButton(2);
        }
    }

    public void postRun()
    {
        //super();
    }

}


Step 4 : Create Contract class 

[DataContractAttribute , SysOperationContractProcessingAttribute(classStr(TestMultiSelectionUIBuilder))]
public final class TestMultiSelectionLookupContract 
{
    List    voucherlist;     

    [DataMemberAttribute("Exclude voucher"),AifCollectionTypeAttribute("Exclude voucher",  Types::String),SysOperationLabelAttribute(literalStr("ExcludeVoucher")),SysOperationDisplayOrderAttribute('0')]
    public List parmVoucherId(List _listVoucherId = voucherlist)
    {
        voucherlist = _listVoucherId;
        return voucherlist;
    }
}

Step 3 : Create DP class 
Create DP class as shown below.
[SRSReportParameterAttribute(classstr(TestMultiSelectionLookupContract))]
public final class TestMultiSelectionDP extends SRSReportDataProviderBase
{
    TestMultiSelectionTmp   testMultiSelectionTmp;
    List                    voucherlist;
    str                     voucherStr;

    [SRSReportDataSetAttribute(tablestr(TestMultiSelectionTmp))]
    public TestMultiSelectionTmp getMTVendorCashForecastTmp()
    {
        select * from testMultiSelectionTmp;
        return testMultiSelectionTmp;
    }

    [SysEntryPointAttribute]
    public void processReport()
    {
        TestMultiSelectionLookupContract    testMultiSelectionLookupContract    = this.parmDataContract() as TestMultiSelectionLookupContract;
        ListIterator                              voucherlistItreator;
        ledgerJournalTrans                  ledgerJournalTrans;
        voucherlist = testMultiSelectionLookupContract.parmVoucherId();

        if(voucherlist != null)
        {
            voucherlistItreator = new ListIterator(voucherlist);
            while (voucherlistItreator.more())
            {
               voucherStr += voucherlistItreator.value()+',';
              
                voucherlistItreator.next();
            }
        }
        voucherStr = subStr(voucherStr,1,strLen(voucherStr)-1);
        Info(voucherStr);


        // write your logic to insert data into temp table.
    }

}

Step 5 : Create report 


Step 6 : Create controller class to call report.

internal final class TestMultiSelectionLookupController extends SrsReportRunController
{
    public void new()
    {
        super();
        this.caption();
    }

    protected final str getReportName(TestMultiSelectionLookupContract _contract)
    {
        str reportNameLocal;

        reportNameLocal = ssrsReportStr(TestMultiSelectionReport,Test1);
        
        return reportNameLocal;
    }

    public ClassDescription caption()
    {
        return "Multi selection lookup";
    }

    public static void main(Args _args)
    {
        TestMultiSelectionLookupController  controller;

        controller = new TestMultiSelectionLookupController();
        controller.parmArgs(_args);
        controller.ParmReportName(ssrsReportStr(TestMultiSelectionReport,Test1));

        controller.startOperation();
    
    }

    protected void preRunModifyContract()
    {
        TestMultiSelectionLookupContract contract = this.parmReportContract().parmRdpContract() as TestMultiSelectionLookupContract;
        this.parmReportContract().parmReportName(this.getReportName(contract));
        super();
    }

}

Step 6 : Create one Output menu item and add object as your controller class and assign it to the menu.


Step Last : 

Result 

Post partial packing slip in D365FO

How to Post a Partial Packing Slip in D365FO and AX 2012 How to Post a Partial Packing Slip in D365FO and AX 2012 Understanding t...