Friday, July 19, 2024

How to Post Partial Product Receipt in D365FO Using X++ Code

How to Post Partial Product Receipt in D365FO Using X++ Code

How to Post Partial Product Receipt in D365FO Using X++ Code

Handling partial product receipts in Microsoft Dynamics 365 for Finance and Operations (D365FO) can be crucial for businesses that receive shipments in stages. In this blog, we'll explore how to post a partial product receipt using X++ code. We'll refer to a specific code example to guide us through the process.

Introduction

Partial product receipt refers to the process of receiving a portion of the goods ordered rather than the entire quantity. This is common in scenarios where suppliers deliver products in multiple shipments. Posting partial product receipts accurately in D365FO ensures that inventory records reflect the actual quantities received.

Code Example Overview

Here's an example of X++ code that demonstrates how to post a partial product receipt. This example focuses on receiving a specific quantity of a purchase order line.


internal final class POReceiptJobTest
{
    /// 
    /// Class entry point. The system will call this method when a designated menu 
    /// is selected or when execution starts and this class is set as the startup class.
    /// 
    /// The specified arguments.
    public static void main(Args _args)
    {
       PurchTable                  purchTable;
       PurchFormLetter             purchFormLetter;
       PurchFormletterParmData     purchFormLetterParmData;
       PurchParmTable              purchParmTable;
       PurchLine                   purchLine;
       PurchParmLine               purchParmLine;

       ttsBegin;

       // Find the purchase order
       purchTable = PurchTable::find('000039');

       // Create PurchParamUpdate table
       purchFormLetterParmData = PurchFormletterParmData::newData(
                        DocumentStatus::PackingSlip,
                        VersioningUpdateType::Initial);

       purchFormLetterParmData.parmOnlyCreateParmUpdate(true);
       purchFormLetterParmData.createData(false);
       PurchParmUpdate purchParmUpdate = purchFormLetterParmData.parmParmUpdate();

       // Set PurchParmTable table
       purchParmTable.clear();
       purchParmTable.TransDate                = SystemDateGet();
       purchParmTable.Ordering                 = DocumentStatus::PackingSlip;
       purchParmTable.ParmJobStatus            = ParmJobStatus::Waiting;
       
       purchParmTable.Num                      = 'Test234567'; // PR
       purchParmTable.PurchId                  = purchTable.PurchId;
       purchParmTable.PurchName                = purchTable.PurchName;
       purchParmTable.DeliveryName             = purchTable.DeliveryName;
       purchParmTable.DeliveryPostalAddress    = purchTable.DeliveryPostalAddress;
       purchParmTable.OrderAccount             = purchTable.OrderAccount;
       purchParmTable.CurrencyCode             = purchTable.CurrencyCode;
       purchParmTable.InvoiceAccount           = purchTable.InvoiceAccount;
       purchParmTable.ParmId                   = purchParmUpdate.ParmId;
       purchParmTable.insert();

       // Set PurchParmLine table
       select purchLine
           where purchLine.PurchId     == purchTable.PurchId &&
           purchLine.LineNumber  == 1;
    
       purchParmLine.initFromPurchLine(purchLine);

       purchParmLine.ReceiveNow    = 5; // Partial quantity received
       purchParmLine.ParmId        = purchParmTable.ParmId;
       purchParmLine.TableRefId    = purchParmTable.TableRefId;
       purchParmLine.setQty(DocumentStatus::PackingSlip, false, true);
       purchParmLine.setLineAmount();
       purchParmLine.insert();

       // Post the packing slip
       purchFormLetter = PurchFormLetter::construct(DocumentStatus::PackingSlip);
       purchFormLetter.transDate(systemDateGet());
       purchFormLetter.proforma(false);
       purchFormLetter.specQty(PurchUpdate::All);
       purchFormLetter.purchTable(purchTable);
       purchFormLetter.parmParmTableNum(purchParmTable.ParmId);
       purchFormLetter.parmId(purchParmTable.ParmId);
       purchFormLetter.purchParmUpdate(purchFormLetterParmData.parmParmUpdate());
       purchFormLetter.run();

       ttsCommit;
    }
}


If you have any questions or need further assistance, feel free to leave a comment below!

Monday, July 15, 2024

How to Return Date Difference in Dynamics 365 Finance and Operations (D365FO) Computed Column

How to Return Date Difference in Dynamics 365 Finance and Operations (D365FO) Computed Column

In Dynamics 365 Finance and Operations (D365FO), computed columns can dynamically calculate and display values derived from other fields or system values. This guide will show you how to create a computed column that calculates the difference in days between a record's creation date and the current date.

Steps to Create a Computed Column and Method

1. Define the Computed Column in the AOT

  1. Open Visual Studio and navigate to the Application Object Tree (AOT).
  2. Expand the Data Dictionary node.
  3. Right-click on Views and select the custom view / Extension of standad view, where you want to add the computed column (e.g., AllPOLinesView).
  4. Click on New > Computed Column.
  5. Name your computed column (e.g., ApprovalDays).
  6. Set the ComputedColumnExpression property to the method you will define for calculating the date difference (e.g., AllPOLinesView::compColumnApprovalDays()).

2. Implement the Computed Column Method (compColumnApprovalDays)

Add the following method to your view's code to calculate the date difference:

private static server str compColumnApprovalDays()
{
    return SysComputedColumn::getDateDiff(
                SysComputedColumn::returnField(tableStr(AllPOLinesView), identifierStr(PurchLine),
                                        fieldId2name(tableNum(PurchLine), fieldNum(PurchLine, CreatedDateTime))),
                SysComputedColumn::getCurrentUtcDate(),
                SysComputedColumnDatePart::Day);
}
    

Explanation of the Method:

  • SysComputedColumn::returnField(tableStr(AllPOLinesView), identifierStr(PurchLine), fieldId2name(tableNum(PurchLine), fieldNum(PurchLine, CreatedDateTime))): Retrieves the CreatedDateTime field from the PurchLine data source in the AllPOLinesView.
  • SysComputedColumn::getCurrentUtcDate(): Gets the current UTC date.
  • SysComputedColumn::getDateDiff(...): Computes the difference in days between the CreatedDateTime field and the current UTC date.
  • SysComputedColumnDatePart::Day: Specifies that the date difference should be calculated in days.

3. Compile and Synchronize

  • Compile your changes in Visual Studio.
  • Synchronize your database to reflect the changes in D365FO.

Using the Computed Column

After setting up the computed column, it will automatically calculate and display the approval days based on the creation date (CreatedDateTime field) for each record in the AllPOLinesView.

Example Usage

Here’s how you can use the computed column in a form or report:

  1. Navigate to the form or report that displays the AllPOLinesView, also make sure ApprovalDays is added on report/Form.
  2. The ApprovalDays computed column will show the number of days between the creation date and the current date for each purchase order line.

Summary

By following these steps, you can create a computed column in D365FO to calculate date differences dynamically. This method enhances data presentation and provides valuable insights based on the computed values. Computed columns like this one can automate calculations and streamline your business processes in D365FO.

Understanding RecVersion, RecId, and Partition Fields in Dynamics 365FO Tables

Understanding RecVersion, RecId, and Partition Fields in Dynamics 365FO Tables

In Dynamics 365 Finance and Operations (D365FO), the RecVersion, RecId, and Partition fields play crucial roles in the data management and integrity of tables. Here’s a detailed explanation of each:

RecVersion

Purpose: The RecVersion field, also known as the "row version" field, is used for optimistic concurrency control.

Functionality: It ensures data integrity when multiple users or processes attempt to update the same record simultaneously.

How it works: When a record is updated, the system checks the RecVersion value. If the RecVersion in the database matches the RecVersion of the record being updated, the update proceeds, and the RecVersion is incremented. If the values do not match, it means another user has updated the record, and the update will be rejected or retried, depending on the application logic.

Example:

public void updateRecord(TableName tableName, int someRecId, int expectedRecVersion, anytype newValue) 
{
    select forupdate tableName where tableName.RecId == someRecId;
    if (tableName.RecVersion == expectedRecVersion) 
    {
        tableName.SomeField = newValue;
        tableName.doUpdate();
    } 
    else 
    {
        // Handle the conflict, e.g., by retrying or notifying the user
    }
}

RecId

Purpose: The RecId field is a unique identifier for each record in a table.

Functionality: It acts as the primary key for the table and is automatically managed by the system.

How it works: When a new record is inserted, the system assigns a unique RecId. This ensures that each record can be uniquely identified and referenced.

Use cases:

  • Foreign key references in related tables.
  • Efficient lookups and indexing.

Example:

public TableName findRecord(int someRecId) 
{
    select tableName where tableName.RecId == someRecId;
    if (tableName.RecId) 
    {
        // Record found, perform operations
    }
    return tableName;
}

Partition

Purpose: The Partition field is used for data partitioning in multi-tenant environments.

Functionality: It allows for logical separation of data for different tenants within the same database.

How it works: Each tenant's data is tagged with a unique partition value. This enables the system to quickly segregate and manage data for different tenants.

Note: In the current versions of D365FO, the use of the Partition field has been deprecated, but it's still present for backward compatibility and in the underlying table structure.

Example:

public TableName findRecordByPartition(int currentPartition, int someRecId) 
{
    select tableName where tableName.Partition == currentPartition && tableName.RecId == someRecId;
    return tableName;
}

Summary

  • RecVersion: Ensures data integrity by preventing conflicts during simultaneous updates.
  • RecId: Provides a unique identifier for each record, facilitating efficient data retrieval and relationships between tables.
  • Partition: Used for data segregation in multi-tenant setups, though now deprecated in favor of other data isolation mechanisms.

These fields are integral to maintaining the performance, scalability, and integrity of data in Dynamics 365 Finance and Operations.

Wednesday, July 3, 2024

Data management package REST API - Import package in dynamics 365FO using postman

Data Management Package REST API - Import Package in Dynamics 365FO Using Postman

Data Management Package REST API - Import Package in Dynamics 365FO Using Postman

Welcome to our comprehensive guide on using the Data Management Package REST API to import data into Dynamics 365 for Finance and Operations (Dynamics 365FO) efficiently. This tutorial will walk you through each step of the process using Postman.Please ensure your Bearer token is generated before proceeding.

This same URL which i am going to use can be trigger from any third party system to integrate with dynamics D365 Finance and operations.

Step 1: Create Import Project

Create an import project in Data Management as shown below.

Create Import Project

Step 2: Get Azure Write URL

Post the GetAzureWriteUrl request to the following endpoint:

POST - {{resource}}/data/DataManagementDefinitionGroups/Microsoft.Dynamics.DataEntities.GetAzureWriteUrl

Body:

{
    "uniqueFileName": "CustomerGroupTestFile"
}

A successful response from GetAzureWriteUrl will provide the necessary URL for the next steps.

Successful response of GetAzureWriteUrl

Step 3: Generate Package

You can generate the package in two ways:

  1. Generate the package as shown in this blog.
  2. Generate the package by exporting it directly from the DMF project as shown below.

Steps to Export Package:

  1. Create an export project.
  2. Run the export project.
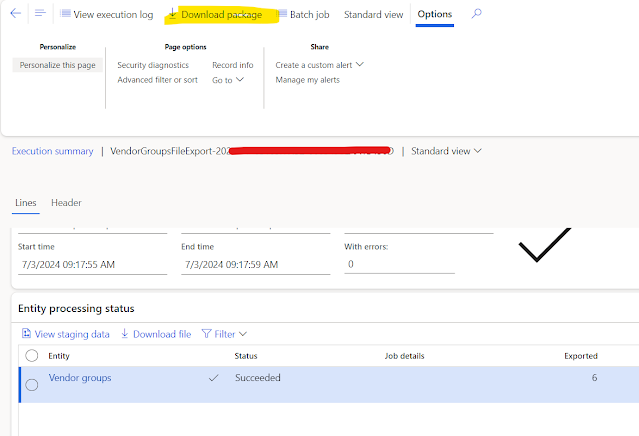
  3. Download the package as shown below.
Create Export Project Run Export Package

Prepare your template in an Excel file.

Download Package

Save it as a Zip. Ensure the Zip contains only the three files shown below.

Extracted Files

Step 4: Upload Package

Copy the highlighted blob URL from the previous response of GetAzureWriteUrl highlited in below screen response section..

Highlighted Blob URL

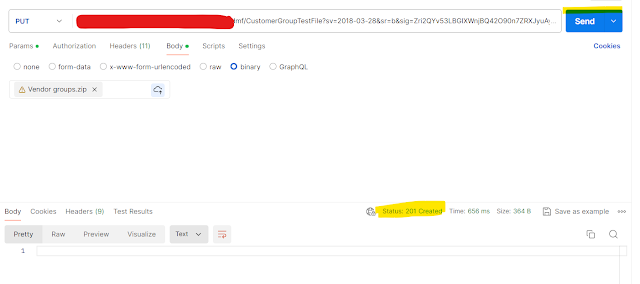
Paste the URL in the URL section select Put method.

Paste URL and Set Parameters

Set the below parameter x-ms-blob-type to BlockBlob.

Set Blob Type

After sending the request, you will receive the response shown below:

Response After Send

Step 5: Import From Package

Post the ImportFromPackage request with the following body:

POST : {{resource}}/data/DataManagementDefinitionGroups/Microsoft.Dynamics.DataEntities.ImportFromPackage

Body:
{
    "packageUrl": "URL on which we have uploaded the package.",
    "definitionGroupId": "VendorGroupsFileImport",
    "executionId": "",
    "execute": true,
    "overwrite": true,
    "legalEntityId": "USMF"
}
Import From Package

Headers for ImportFromPackage

Headers for ImportFromPackage

The response of ImportFromPackage

Response of ImportFromPackage

New batch history record created under the import group.

Headers for ImportFromPackage

Conclusion

By following these detailed steps, you can effectively manage data imports using the Data Management Package REST API in Dynamics 365FO. This approach not only ensures accuracy but also enhances the efficiency of handling large data sets within your organization.

Data management package REST API - Export package in dynamics 365FO using postman

How to Export Data Packages in Microsoft Dynamics 365 finance and operations

How to Export Data Packages in Microsoft Dynamics 365 finance and operations

Hi All,

In this tutorial, we will guide you through the process of exporting data packages in Microsoft Dynamics 365. Please ensure your Bearer token is generated before proceeding.

This same URL which i am going to use can be trigger from any third party system to integrate with dynamics D365 Finance and operations.

Step 1: Create a New Export Project in Data Management

First, navigate to the Data Management workspace in Dynamics 365 and create a new export project. This project will define the data you wish to export.

Data Management Workspace

Step 2: ExportToPackage Request via Postman

To export a package, you need to send a request from Postman. Here are the details you need:

  • {{resource}}: Your Dynamics 365 URL
  • definitionGroupId: Group name from the previous screenshot
  • packageName: Desired name for the package

POST : {{resource}}/data/DataManagementDefinitionGroups/Microsoft.Dynamics.DataEntities.ExportToPackage

      Body:
      {
          "definitionGroupId":"VendorGroupsFileExport",
          "packageName":"VendorGroupPackage",
          "executionId":"VendorGroupExecutionId-1",
          "reExecute":false,
          "legalEntityId":"USMF"   
      }
    

ExportToPackage Request in Postman

Successful Response of ExportToPackage request

Upon successful execution, you will receive a response indicating that the export has been initiated.

Successful ExportToPackage Response

Step 3: Check Export Status with GetExecutionSummaryStatus

Next, check the status of your export by sending a GetExecutionSummaryStatus request.

POST Request:

{{resource}}/data/DataManagementDefinitionGroups/Microsoft.Dynamics.DataEntities.GetExecutionSummaryStatus

Body:
{
    "executionId": "VendorGroupExecutionId-1"
}
    

GetExecutionSummaryStatus Request in Postman

Successful Response of GetExecutionSummaryStatus request

You will receive a response indicating the current status of your export.

Successful Check Export Status Response

Step 4: Retrieve the Exported Package URL

Finally, retrieve the URL of the exported package with a GetExportedPackageUrl request.

POST Request:

{{resource}}/data/DataManagementDefinitionGroups/Microsoft.Dynamics.DataEntities.GetExportedPackageUrl

Body:
{
    "executionId": "VendorGroupExecutionId-1"
}
    

GetExportedPackageUrl Request in Postman

Successful Response of GetExportedPackageUrl request

You will receive a response with a URL to download the exported package.

Successful GetExportedPackageUrl Response

Download the Package

Copy and paste the URL from the response into your browser to download the package.

Downloaded Package

By following these steps, you can successfully export data packages in Microsoft Dynamics 365. If you have any questions, feel free to reach out in the comments below.

Happy exporting!

How to Post Partial Product Receipt in D365FO Using X++ Code

How to Post Partial Product Receipt in D365FO Using X++ Code How to Post Partial Product Receipt in D365FO Using X++...