Monday, July 15, 2024

Understanding RecVersion, RecId, and Partition Fields in Dynamics 365FO Tables

Understanding RecVersion, RecId, and Partition Fields in Dynamics 365FO Tables

In Dynamics 365 Finance and Operations (D365FO), the RecVersion, RecId, and Partition fields play crucial roles in the data management and integrity of tables. Here’s a detailed explanation of each:

RecVersion

Purpose: The RecVersion field, also known as the "row version" field, is used for optimistic concurrency control.

Functionality: It ensures data integrity when multiple users or processes attempt to update the same record simultaneously.

How it works: When a record is updated, the system checks the RecVersion value. If the RecVersion in the database matches the RecVersion of the record being updated, the update proceeds, and the RecVersion is incremented. If the values do not match, it means another user has updated the record, and the update will be rejected or retried, depending on the application logic.

Example:

public void updateRecord(TableName tableName, int someRecId, int expectedRecVersion, anytype newValue) 
{
    select forupdate tableName where tableName.RecId == someRecId;
    if (tableName.RecVersion == expectedRecVersion) 
    {
        tableName.SomeField = newValue;
        tableName.doUpdate();
    } 
    else 
    {
        // Handle the conflict, e.g., by retrying or notifying the user
    }
}

RecId

Purpose: The RecId field is a unique identifier for each record in a table.

Functionality: It acts as the primary key for the table and is automatically managed by the system.

How it works: When a new record is inserted, the system assigns a unique RecId. This ensures that each record can be uniquely identified and referenced.

Use cases:

  • Foreign key references in related tables.
  • Efficient lookups and indexing.

Example:

public TableName findRecord(int someRecId) 
{
    select tableName where tableName.RecId == someRecId;
    if (tableName.RecId) 
    {
        // Record found, perform operations
    }
    return tableName;
}

Partition

Purpose: The Partition field is used for data partitioning in multi-tenant environments.

Functionality: It allows for logical separation of data for different tenants within the same database.

How it works: Each tenant's data is tagged with a unique partition value. This enables the system to quickly segregate and manage data for different tenants.

Note: In the current versions of D365FO, the use of the Partition field has been deprecated, but it's still present for backward compatibility and in the underlying table structure.

Example:

public TableName findRecordByPartition(int currentPartition, int someRecId) 
{
    select tableName where tableName.Partition == currentPartition && tableName.RecId == someRecId;
    return tableName;
}

Summary

  • RecVersion: Ensures data integrity by preventing conflicts during simultaneous updates.
  • RecId: Provides a unique identifier for each record, facilitating efficient data retrieval and relationships between tables.
  • Partition: Used for data segregation in multi-tenant setups, though now deprecated in favor of other data isolation mechanisms.

These fields are integral to maintaining the performance, scalability, and integrity of data in Dynamics 365 Finance and Operations.

Wednesday, July 3, 2024

Data management package REST API - Import package in dynamics 365FO using postman

Data Management Package REST API - Import Package in Dynamics 365FO Using Postman

Data Management Package REST API - Import Package in Dynamics 365FO Using Postman

Welcome to our comprehensive guide on using the Data Management Package REST API to import data into Dynamics 365 for Finance and Operations (Dynamics 365FO) efficiently. This tutorial will walk you through each step of the process using Postman.Please ensure your Bearer token is generated before proceeding.

This same URL which i am going to use can be trigger from any third party system to integrate with dynamics D365 Finance and operations.

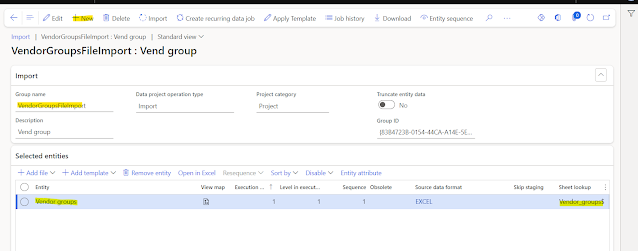
Step 1: Create Import Project

Create an import project in Data Management as shown below.

Create Import Project

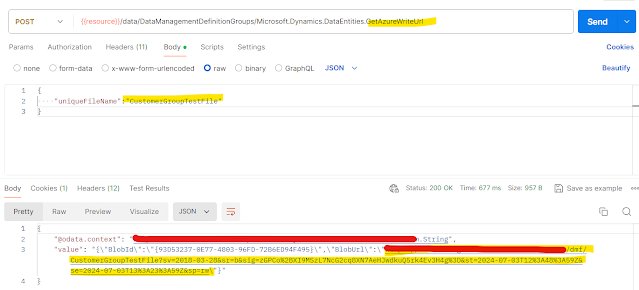
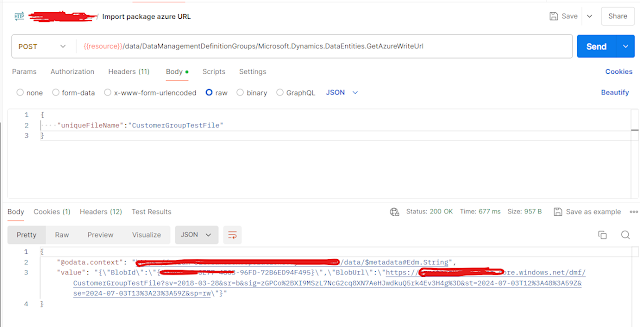
Step 2: Get Azure Write URL

Post the GetAzureWriteUrl request to the following endpoint:

POST - {{resource}}/data/DataManagementDefinitionGroups/Microsoft.Dynamics.DataEntities.GetAzureWriteUrl

Body:

{
    "uniqueFileName": "CustomerGroupTestFile"
}

A successful response from GetAzureWriteUrl will provide the necessary URL for the next steps.

Successful response of GetAzureWriteUrl

Step 3: Generate Package

You can generate the package in two ways:

  1. Generate the package as shown in this blog.
  2. Generate the package by exporting it directly from the DMF project as shown below.

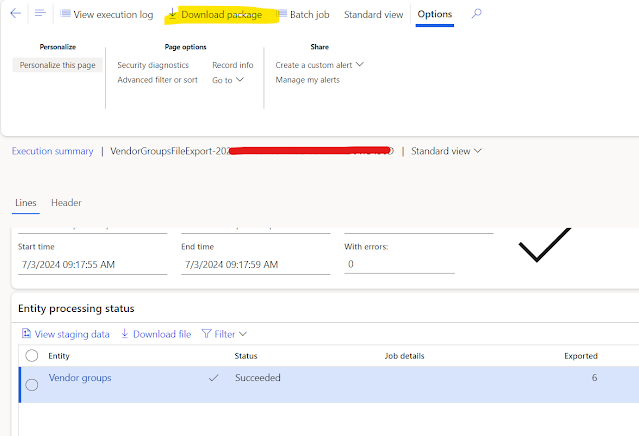
Steps to Export Package:

  1. Create an export project.
  2. Run the export project.
  3. Download the package as shown below.
Create Export Project Run Export Package

Prepare your template in an Excel file.

Download Package

Save it as a Zip. Ensure the Zip contains only the three files shown below.

Extracted Files

Step 4: Upload Package

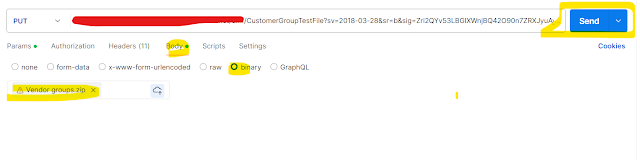
Copy the highlighted blob URL from the previous response of GetAzureWriteUrl highlited in below screen response section..

Highlighted Blob URL

Paste the URL in the URL section select Put method.

Paste URL and Set Parameters

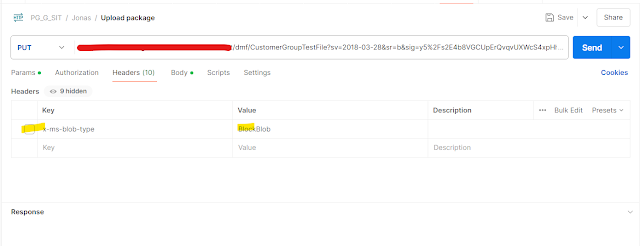
Set the below parameter x-ms-blob-type to BlockBlob.

Set Blob Type

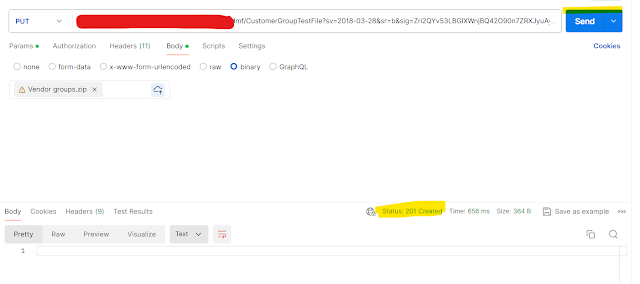
After sending the request, you will receive the response shown below:

Response After Send

Step 5: Import From Package

Post the ImportFromPackage request with the following body:

POST : {{resource}}/data/DataManagementDefinitionGroups/Microsoft.Dynamics.DataEntities.ImportFromPackage

Body:
{
    "packageUrl": "URL on which we have uploaded the package.",
    "definitionGroupId": "VendorGroupsFileImport",
    "executionId": "",
    "execute": true,
    "overwrite": true,
    "legalEntityId": "USMF"
}
Import From Package

Headers for ImportFromPackage

Headers for ImportFromPackage

The response of ImportFromPackage

Response of ImportFromPackage

New batch history record created under the import group.

Headers for ImportFromPackage

Conclusion

By following these detailed steps, you can effectively manage data imports using the Data Management Package REST API in Dynamics 365FO. This approach not only ensures accuracy but also enhances the efficiency of handling large data sets within your organization.

Data management package REST API - Export package in dynamics 365FO using postman

How to Export Data Packages in Microsoft Dynamics 365 finance and operations

How to Export Data Packages in Microsoft Dynamics 365 finance and operations

Hi All,

In this tutorial, we will guide you through the process of exporting data packages in Microsoft Dynamics 365. Please ensure your Bearer token is generated before proceeding.

This same URL which i am going to use can be trigger from any third party system to integrate with dynamics D365 Finance and operations.

Step 1: Create a New Export Project in Data Management

First, navigate to the Data Management workspace in Dynamics 365 and create a new export project. This project will define the data you wish to export.

Data Management Workspace

Step 2: ExportToPackage Request via Postman

To export a package, you need to send a request from Postman. Here are the details you need:

  • {{resource}}: Your Dynamics 365 URL
  • definitionGroupId: Group name from the previous screenshot
  • packageName: Desired name for the package

POST : {{resource}}/data/DataManagementDefinitionGroups/Microsoft.Dynamics.DataEntities.ExportToPackage

      Body:
      {
          "definitionGroupId":"VendorGroupsFileExport",
          "packageName":"VendorGroupPackage",
          "executionId":"VendorGroupExecutionId-1",
          "reExecute":false,
          "legalEntityId":"USMF"   
      }
    

ExportToPackage Request in Postman

Successful Response of ExportToPackage request

Upon successful execution, you will receive a response indicating that the export has been initiated.

Successful ExportToPackage Response

Step 3: Check Export Status with GetExecutionSummaryStatus

Next, check the status of your export by sending a GetExecutionSummaryStatus request.

POST Request:

{{resource}}/data/DataManagementDefinitionGroups/Microsoft.Dynamics.DataEntities.GetExecutionSummaryStatus

Body:
{
    "executionId": "VendorGroupExecutionId-1"
}
    

GetExecutionSummaryStatus Request in Postman

Successful Response of GetExecutionSummaryStatus request

You will receive a response indicating the current status of your export.

Successful Check Export Status Response

Step 4: Retrieve the Exported Package URL

Finally, retrieve the URL of the exported package with a GetExportedPackageUrl request.

POST Request:

{{resource}}/data/DataManagementDefinitionGroups/Microsoft.Dynamics.DataEntities.GetExportedPackageUrl

Body:
{
    "executionId": "VendorGroupExecutionId-1"
}
    

GetExportedPackageUrl Request in Postman

Successful Response of GetExportedPackageUrl request

You will receive a response with a URL to download the exported package.

Successful GetExportedPackageUrl Response

Download the Package

Copy and paste the URL from the response into your browser to download the package.

Downloaded Package

By following these steps, you can successfully export data packages in Microsoft Dynamics 365. If you have any questions, feel free to reach out in the comments below.

Happy exporting!

Tuesday, February 13, 2024

Post partial packing slip in D365FO

How to Post a Partial Packing Slip in D365FO and AX 2012

How to Post a Partial Packing Slip in D365FO and AX 2012

Understanding the Code

Below is the X++ code snippet demonstrating how to post a partial packing slip for a sales order:

public void postPartialPackingSlip(SalesId _salesId)
{
    SalesFormLetter_PackingSlip     salesFormLetter_PackingSlip;
    salesFormLetter                 salesFormLetter;
    salesFormletterParmData         salesFormLetterParmData;

    SalesParmTable                  salesParmTable;
    SalesParmLine                   salesParmLine;
    salesLine                       salesLine, salesLineUpd;
    salesParmUpdate                 salesParmUpdate;
    SalesTable                      salestable = SalesTable::find(_salesId, true);
    CustPackingSlipJour             custPackingSlipJour;
    TransDate                       packingSlipDate = DateTimeUtil::getSystemDate(DateTimeUtil::getUserPreferredTimeZone());
    InventDim                       inventDim;
    InventLocation                  inventLocation;

    ttsbegin;
    salesFormLetterParmData = salesFormletterParmData::newData(DocumentStatus::PackingSlip, VersioningUpdateType::Initial);

    salesFormLetterParmData.parmOnlyCreateParmUpdate(true);
    salesFormLetterParmData.createData(false);
    salesParmUpdate = salesFormLetterParmData.parmParmUpdate();

    salesParmTable.clear();
    salesParmTable.TransDate                = PackingSlipDate;
    salesParmTable.Ordering                 = DocumentStatus::PackingSlip;
    salesParmTable.ParmJobStatus            = ParmJobStatus::Waiting;
    salesParmTable.salesId                  = salesTable.salesId;

    salesParmTable.salesName                = salesTable.salesName;
    salesParmTable.DeliveryName             = salesTable.DeliveryName;
    salesParmTable.DeliveryPostalAddress    = salesTable.DeliveryPostalAddress;
    salesParmTable.CustAccount              = salesTable.CustAccount;
    salesParmTable.CurrencyCode             = salesTable.CurrencyCode;
    salesParmTable.InvoiceAccount           = salesTable.InvoiceAccount;
    salesParmTable.ParmId                   = salesParmUpdate.ParmId;
    salesParmTable.insert();

    while select salesLine 
        where salesLine.SalesId == salestable.SalesId
            Join InventDim 
            where inventdim.inventDimId == salesLine.InventDimId
                join inventLocation 
                where inventlocation.InventLocationId == inventdim.InventLocationId
                && inventlocation.TestOwnWareHouse == NoYes::Yes
    {
  
        salesParmLine.InitFromsalesLine(salesLine);
        salesParmLine.DeliverNow    = salesLine.SalesQty;
        salesParmLine.ParmId        = salesParmTable.ParmId;
        salesParmLine.TableRefId    = salesParmTable.TableRefId;
        salesParmLine.setQty(DocumentStatus::PackingSlip, false, true);
        salesParmLine.setLineAmount(salesLine);
        salesParmLine.insert();
    }

    salesFormLetter_PackingSlip = salesFormLetter::construct(DocumentStatus::PackingSlip);
    salesFormLetter_PackingSlip.transDate(PackingSlipDate);
    salesFormLetter_PackingSlip.proforma(false);
    salesFormLetter_PackingSlip.specQty(salesUpdate::All);
    salesFormLetter_PackingSlip.salesTable(salesTable);
    salesFormLetter_PackingSlip.parmId(salesParmTable.ParmId);
    salesFormLetter_PackingSlip.salesParmUpdate(salesFormLetterParmData.parmParmUpdate());
    salesFormLetter_PackingSlip.run();
       
    if (salesFormLetter_PackingSlip.parmJournalRecord().TableId == tableNum(custPackingSlipJour))
    {
        custPackingSlipJour = salesFormLetter_PackingSlip.parmJournalRecord();
        info(custPackingSlipJour.packingSlipId)
    }
    ttscommit;
    
}

Steps to Post a Partial Packing Slip

  1. Initialization: The process begins by initializing necessary variables and objects, such as salesFormLetter_PackingSlip and salesParmUpdate.
  2. Creating Sales Parameters: Sales parameters are populated with relevant data from the sales order, such as customer details, delivery information, and currency.
  3. Handling Sales Lines: Iterate through sales lines associated with the sales order. For each line, initialize a salesParmLine object and set relevant parameters. Ensure the line is associated with a warehouse (TestOwnWareHouse == NoYes::Yes) before proceeding.
  4. Generating the Packing Slip: Use the salesFormLetter_PackingSlip object to generate the packing slip. Set parameters such as transaction date and sales table details. Finally, execute the packing slip generation process.
  5. Verifying the Packing Slip: After generating the packing slip, verify if the process was successful by checking the parmJournalRecord. If successful, retrieve relevant information such as the packing slip ID.

Conclusion

Automating the creation and posting of packing slips, including partial packing slips, streamlines the order fulfillment process in D365FO and AX 2012. By leveraging X++ code, businesses can ensure accuracy and efficiency in their shipping operations.

Friday, December 15, 2023

JSON serialization in X++

JSON Serialization in X++

JSON Serialization in X++

TestCustTransExportRequest Class

The TestCustTransExportRequest class represents the request data for exporting customer transactions.

[datacontractAttribute] class TestCustTransExportRequest { String10 dataAreaId; CustAccount custAcc; [DataMemberAttribute("dataAreaId")] public String10 parmDataAreaId(String10 _dataAreaId = dataAreaId) { dataAreaId = _dataAreaId; return dataAreaId; } [DataMemberAttribute("CustomerAccount")] public CustAccount parmCustAcc(CustAccount _custAcc = custAcc) { custAcc = _custAcc; return custAcc; } }

TestCustTransListResponseContract Class

The TestCustTransListResponseContract class is a response data contract representing customer transaction details. This class includes properties for various transaction details such as type, date, amount, and currency. The [DataMemberAttribute] attribute is used to specify the names of these properties in the serialized JSON.

[datacontractAttribute] class TestCustTransListResponseContract { Str60 transType; ExchRate exchRate; String30 transDate; AmountCur amountCur; CurrencyCode currency; TransactionTextLarge description; AmountMST amountMST; AmountCur remainAmountBal; String10 dataAreaId; CustAccount custAcc; [DataMemberAttribute("Channel")] public String10 parmDataAreaId(String10 _dataAreaId = dataAreaId) { dataAreaId = _dataAreaId; return dataAreaId; } [DataMemberAttribute("Customer Id")] public CustAccount parmCustAcc(CustAccount _custAcc = custAcc) { custAcc = _custAcc; return custAcc; } [DataMemberAttribute("Transaction type")] public Str60 parmTransType(Str60 _transType = transType) { transType = _transType; return transType; } [DataMemberAttribute("Date")] public String30 parmTransDate(String30 _transDate = transDate) { transDate = _transDate; return transDate; } [DataMemberAttribute("Description")] public TransactionTextLarge parmDescription(TransactionTextLarge _description = description) { description = _description; return description; } [DataMemberAttribute("Amount in currency")] public AmountCur parmAmountCur(AmountCur _amountMST = amountCur) { amountCur = _amountMST; return amountCur; } [DataMemberAttribute("Currency")] public CurrencyCode parmCurrencyCode(CurrencyCode _currency = currency) { currency = _currency; return currency; } [DataMemberAttribute("Amount in accounting currency")] public AmountMST parmAmountMST(AmountMST _amountMST = amountMST) { amountMST = _amountMST; return amountMST; } [DataMemberAttribute("Exchange rate")] public exchRate parmExchRate(ExchRate _exchRate = exchRate) { exchRate = _exchRate; return exchRate; } [DataMemberAttribute("Balance")] public AmountCur parmRemainAmount(AmountCur _remainAmountBal = remainAmountBal) { remainAmountBal = _remainAmountBal; return remainAmountBal; } }

TestCustTransExportResponse Class

The TestCustTransExportResponse class represents the response data for exporting customer transactions. It contains a list of transaction data. This class is designed to be serialized into a JSON structure containing an array of transactions.

class TestCustTransExportResponse { List transactionData = new List(Types::Class); CustAccount custAcc; String10 dataAreaId; [DataMemberAttribute("Transactions"),DataCollectionAttribute(Types::Class, classStr(TestCustTransListResponseContract))] public List parmTransactionData(List _transactionData = transactionData) { transactionData = _transactionData; return transactionData; } }

TestCustTransExportService Class

The TestCustTransExportService class is a custom web service class that processes export transactions based on the provided request. It uses the other three classes to gather and structure the transaction data, and then returns the response in the specified JSON format.

class TestCustTransExportService extends SysOperationServiceBase { public TestCustTransExportResponse processExportTransaction(TestCustTransExportRequest _requestedCustomer) { TestCustTransExportResponse response = new TestCustTransExportResponse(); CustTrans custTrans; List custTransactionsList = new List(Types::Class); CustAccount custAccount = _requestedCustomer.parmCustAcc(); Microsoft.Dynamics.Ax.Xpp.ErrorException errorEx; try { changecompany(_requestedCustomer.parmDataAreaId()) { while select custTrans where custTrans.AccountNum == custAccount && (custTrans.AmountCur - custTrans.SettleAmountCur) != 0 { TestCustTransListResponseContract custTransListContract = new TestCustTransListResponseContract(); custTransListContract.parmCustAcc(custTrans.AccountNum); custTransListContract.parmDataAreaId(custTrans.DataAreaId); custTransListContract.parmTransType(enum2Str(custTrans.TransType)); custTransListContract.parmTransDate(date2StrUsr(custTrans.TransDate)); custTransListContract.parmDescription(custTrans.Txt); custTransListContract.parmamountCur(custTrans.AmountCur); custTransListContract.parmAmountMST(custTrans.AmountMST); custTransListContract.parmExchRate(custTrans.ExchRate); custTransListContract.parmRemainAmount(custTrans.remainAmountCur()); custTransListContract.parmCurrencyCode(custTrans.CurrencyCode); custTransactionsList.addEnd(custTransListContract); } response.parmTransactionData(custTransactionsList); } } catch(errorEx) { throw error(strFmt("Validation failed for customer %1.",custAccount, errorEx.Message)); } catch (Exception::CLRError) { System.Exception ex = CLRInterop::getLastException(); throw error(strFmt("Validation failed for customer %1.",custAccount, ex.Message)); } return response; } }

JSON Input

{
    "_requestedCustomer": 
    {
        "dataAreaId": "SE02",
        "CustomerAccount": "C0002"
    }
}
        

JSON Output

{
    "$id": "1",
    "Transactions": [
        {
            "$id": "2",
            "Channel": "Site1",
            "Customer Id": "TestCustomer",
            "Transaction type": "Sales order",
            "Date": "11/12/2023",
            "Description": "Credit IN000001VR6 SO SE02-12345VR6 11/12/2023",
            "Amount in currency": -2500.0,
            "Currency": "SEK",
            "Amount in accounting currency": -2500.0,
            "Exchange rate": 100.0,
            "Balance": -2500.0
        },
        {
            "$id": "3",
            "Channel": "Site1",
            "Customer Id": "TestCustomer",
            "Transaction type": "Sales order",
            "Date": "11/12/2023",
            "Description": "Credit IN000001VR7 SO SE02-12345VR7 11/12/2023",
            "Amount in currency": -2500.0,
            "Currency": "SEK",
            "Amount in accounting currency": -2500.0,
            "Exchange rate": 100.0,
            "Balance": -2500.0
        }
    ]
}
        

Wednesday, December 13, 2023

Creating Dependent Tasks in Dynamics 365 Finance and Operations Batch Jobs with X++ Code

Creating Dependent Tasks in Dynamics 365 Finance and Operations Batch Jobs with X++ Code

Creating Dependent Tasks in Dynamics 365 Finance and Operations Batch Jobs with X++ Code

Batch processing is a critical component in handling large-scale data operations within Dynamics 365 Finance and Operations (D365FO). Often, there's a need to create dependent tasks within batch jobs to ensure proper sequencing and execution. In this blog post, we will explore how to create dependent tasks using X++ code in D365FO, based on the provided example.

Understanding the Code

    BatchHeader batchHeader = BatchHeader::construct();

// First task (your first batch job)
DMFBatchImporter batchImporter = new DMFBatchImporter();

batchImporter.batchInfo().parmBatchExecute(NoYes::Yes);
batchImporter.parmReadyForBatchRun(true);
DMFExecutionId batchExecutionId = DMFPackageImporter::PrepareDefinitionGroupForImport(definitionGroupName, executionId, dataAreaId, true);
batchImporter.parmExecutionId(batchExecutionId);

batchHeader.addTask(batchImporter);
batchHeader.addRuntimeTask(batchImporter, BatchHeader::getCurrentBatchTask().RecId);

// Add your second batch job here
TestIntegrationBatch integrationBatch = new TestIntegrationBatch();
integrationBatch.parmLogRecId(logRecId);
integrationBatch.batchInfo().parmGroupId(definition.BatchGroupId);

batchHeader.parmCaption(strFmt('%1 - Test Log - %2', TestIntegrationBatch::description(), logRecId));
// Add second task
batchHeader.addRuntimeTask(integrationBatch, BatchHeader::getCurrentBatchTask().RecId);
// Add dependency
batchHeader.addDependency(integrationBatch, batchImporter, BatchDependencyStatus::FinishedOrError);
batchHeader.save();


Step-by-Step Guide on Creating Dependent Tasks

  1. Batch Header Initialization:

    Create a new instance of BatchHeader to represent the batch job.

  2. First Task - DMFBatchImporter:

    Instantiate the primary task (DMFBatchImporter). Set necessary parameters for batch execution. Prepare the execution ID using DMFPackageImporter::PrepareDefinitionGroupForImport. Add the task to the batch header using addTask. Add the task as a runtime task using addRuntimeTask.

  3. Second Task - TestIntegrationBatch:

    Instantiate the secondary task (TestIntegrationBatch). Set any required parameters for this task.

  4. Batch Header Configuration:

    Set the caption for the batch header for better identification. Add the secondary task as a runtime task. Define a dependency between tasks using addDependency. In this case, the dependency is set to FinishedOrError, meaning the second task will execute only when the first task finishes successfully or encounters an error.

  5. Save Batch Header:

    Save the configured batch header to persist the changes.

Conclusion

Creating dependent tasks in batch jobs is essential for maintaining the proper flow of data processing in Dynamics 365 Finance and Operations. The provided X++ code showcases the integration of two tasks with a dependency relationship. Customize this example according to your specific business requirements and extend the logic as needed to handle more complex scenarios in your batch processing workflows.
Wednesday, October 4, 2023

How to send Lasernet report PDF on email.

Calling Lasernet Report from X++ Code in Dynamics 365 Finance and Operations

Calling Lasernet Report from X++ Code in Dynamics 365 Finance and Operations

Published on October 4, 2023 by Your Name

Hi All,

I hope everybody is doing great and learning isn't stopped. Today, I am here with another article that will help us call a Lasernet report from X++ code in Dynamics 365 Finance and Operations. Let me explain my requirement. I have a requirement to send the SalesPackingSlipReport over email, but we don't want to use the standard report designs because we have implemented the ISV solution "Lasernet." So, here comes the challenge: how can we call it? I got some input from the below blog, but after that, I faced lots of problems, but finally, I have achieved it.
Lasernet User Guide

Prerequisites to follow
step 1 :


class FPPrintReport
{
    public static void main(Args _args)
    {
        CustPackingSlipJour custPackingSlipJour = CustPackingSlipJour::findRecId(5637146826);
        FPPrintReport::sendPackingSlipByEmail('200030-SHI-UK01', custPackingSlipJour, 
        	'vijay.yelmame14@gmail.com', 'Test.pdf');
    }

    public static void sendPackingSlipByEmail(WHSShipmentId _shipmentId, 
    	CustPackingSlipJour custPackingSlipJour, Email _ToEmail, Filename _fileName)
    {
        CustFormletterParameters custFormParm = CustFormletterParameters::find();

        if (custFormParm.TestEnableEmailPackSlipReport)
        {
            SalesPackingSlipController formLetterController = SalesPackingSlipController::construct();
            SRSPrintDestinationSettings destinationSettings = new SRSPrintDestinationSettings();
            destinationSettings.printMediumType(SRSPrintMediumType::LAC);

            LACDestinationSettings LACDestinationSettings = new LACDestinationSettings();
            LACDestinationSettings.destTypes4Print(LACDestTypes4Print::Email);
            
            LACDestinationSettings.emailFrom(custFormParm.TestFromEmailAddress);
            LACDestinationSettings.emailTo(_ToEmail);
            LACDestinationSettings.emailSubject(strFmt(custFormParm.TestEmailSubject, _shipmentId));
            LACDestinationSettings.emailBody(custFormParm.TestEmailBody);
            LACDestinationSettings.allowForcedReRun(NoYes::Yes);
            LACDestinationSettings.emailFromName('Test Test');

            destinationSettings.lacDestinationSettings(LACDestinationSettings);

            LACReport report = LACReport::find(ssrsReportStr(Salespackingslip, Report));
            LACResendReport::resendReportFromRecord(report.ReportName, custPackingSlipJour, destinationSettings, true);
        }
    }
}

That's it! You can now follow these steps to call Lasernet reports from your X++ code in Dynamics 365 Finance and Operations. This solution should help you send your SalesPackingSlipReport over email using Lasernet.

If you have any questions or encounter any issues, please feel free to ask. Happy coding!

Update Values During Data Entity Import in D365FO

Update Values During Data Entity Import in D365FO Updating Field Values During Data Entity Import in Dynamics 365 Finance ...